Sunday, March 27, 2011

Custom Newspapers

Newspapers frequent many prop lists and can require custom headlines and photos. How can you create them? This was the technique I used for Floyd Collins and Bonnie and Clyde.


Custom newspaper layout for Bonnie and Clyde


1. Research newspapers of the era, and share them with the director. 
(Remember the library and the giant microfilm equipment? Don't limit your research to the internet!)

2. Have the actors rehearse with paper cut to the dimensions of your custom newspaper.
(It might seem strange but it can save hours of revisions.)

3.  Create a Photoshop document to the dimensions of the rehearsal newspaper (front and back).
Switch to grayscale and keep your resolution around 150 pixels/inch. A 30in width by 22.75in height will match the US standard size.

4. Find your fonts and upload them to all the computers you'll be using.
Dafont.com and fontempire.com are excellent resources. If you'll be going between multiple machines install the fonts on all of them!

5. Set your guides in Photoshop.
Click and drag off the ruler, and you'll notice a blue line follows you. This may be my favorite feature in Photoshop. Guidelines! Set up boundaries similar to your research.

6. Add lines, text, and photos.
Add vertical lines over your guides to divide your columns if you like. Or not, look at the research. Either take custom photos of the actors for the headlines, or find public domain images. To help age your shots experiment with the Noise filter options. Don't worry about actually writing authentic stories for the filler. Even the audience member 5 feet away won't be able to read it. And label your layers, or you'll be navigating a layer labyrinth during tech.

7. Import the back page (if you can).
Unless you need a very specific back page to the newspaper, save time by finding a public domain images/advertisement from the era. During Bonnie and Clyde the newspapers were never unfolded, and yours may not be either.

8. Save as a pdf and print!
Save the document as a psd and pdf. (And prior to saving the pdf merge layers. If you can print in-house on your plotter, wonderful! If not, schedule a late night party at your local FedEx Kinko's. Black and white oversize printing will cost around $1 a square foot. 

By the way, odds are you won't find a print shop willing to run newsprint through their equipment. Which is fine - print on the standard white paper. It's more durable anyway!

9. Mist printed pages with gray spray paint and sand edges.
Newspapers aren't printed on high-quality paper. Mist with gray for the 'hot-off-the-press' look, or age the paper with yellows and browns.

10. Stuff the newspaper with misted and sanded paper.
If there's junked light plots/floor plans around first ask if they're really trash, then stuff your newspaper.


If you don't know Photoshop, learn it! Prop work will be easier, your resume will look sharper, and your portfolio will be more professional. (This post was process-heavy for my taste. But newspapers are such a regular occurrence on prop lists.) Next week's project will not use Photoshop, I promise!

Sunday, March 20, 2011

Candy Wrappers?

Good Morning! To everyone recovering from the Floyd Collins strike last night - Congratulations on the completion of such an ambitious project!

This week's post will feature another project that came up while working on Floyd's props. Here's some ideas for the creation of period candy wrappers:

1. Call Grandma. Seriously. She'll enjoy reminiscing about childhood candy and the opportunity to help you on a project.

2. More research! Find images online and scale them to the appropriate size. Floyd's were printed on regular typing paper. I selected Squirrel Nut Zippers, Nestles Funnies, and Flying Lindy Sandwiches.


3. Age the typing paper. For this project I used Design Master's Glossy Wood Tone. I followed that layer with a clear gloss (to look a bit more like wax paper). Treat both sides of the paper.


4. Cut out the wrappers, and fold them around a small wood chip.


Finished product.

Sunday, March 13, 2011

Cameras for Collins

I'm currently sitting in tech for the upcoming musical Floyd Collins, a production by Florida Players. The musical tells the tale of an explorer trapped in a Kentucky cave, the resulting media-frenzy, and the (literal) carnival that erupts above him.

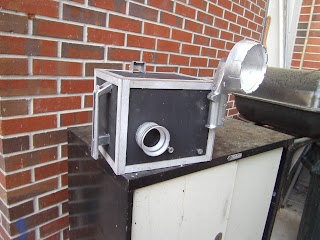
This production requires two cameras - one for early motion pictures, one for film. The budget for both cameras was $10. The cameras aren't replicas of particular models. The goal was to create pieces that appeared to be primitive film technology, yet shiny and foreign compared to the wooden crates and ropes of the Kentucky camp.

Scrap lumber from the shop was utilized for the boxes (1/2" and 3/4"plywood, as well as 1/8" and 1/4" luan). Two cameras were scraped for lenses and buttons. Goodwill is a great resource. If you have enough lead time you can even request they save any broken cameras. And some similar stores don't sell donated film cameras.


The (implied) flash on the film camera is made from part of a VHS film camera and parts from a broken flashlight. In this case lighting designer will be providing the flash with a strobe.


The crank on the film camera was a bit tricky - it's made from a baton handle, spring, coat hangers, PVS, and a small amount of hardware.


Total cost of cameras = less than 4 hours in the shop, $8.50 in materials.

For more information on the production visit Florida Players.

Welcome

'Insert standard 'First post, whoo-hoo!' greeting here.'

Hiya - I'm Jovon, and welcome to Prop Adventures - my first attempt and blogging about my projects as a Prop Master and Scenic Designer.

As a prop master, I work with the director, actors, and scenic designer to create items that fit into the world of the production. The process starts with research, proceeds to a phase of trial and (not too much) error, and doesn't really finish until strike.

Over the years I've constructed some oddities - whether Mrs. Lovett's meat grinder or Blanche's birthday cake, the process is creative, challenging, and always rewarding.

I hope to share a new project every Sunday, so swing by after you've checked Post Secret's updates!

Thanks!